TL;DR
Acoustic dampening reduces reflections, but soundproofing stops noise leaks. Proper placement and ventilation in a closet boost sound quality and keep your rig cool. The best approach involves a mix of sealing gaps, strategic placement, and ventilation.
Ever tried recording vocals in a tiny closet? It can be surprisingly good—if you know what you’re doing. But most people get stuck thinking foam alone will turn their closet into a professional studio. The truth? Placement, sealing gaps, and ventilation matter way more than just adding foam. This guide cuts through the noise and shows you how to make your closet work for sound quality, not just look good.
Whether you’re recording voiceovers, podcasts, or just want a quieter workspace, you’ll learn the real secrets to dampening sound, blocking leaks, and keeping your gear cool. No fluff, just practical, proven tips that turn that awkward closet into a mini studio powerhouse.
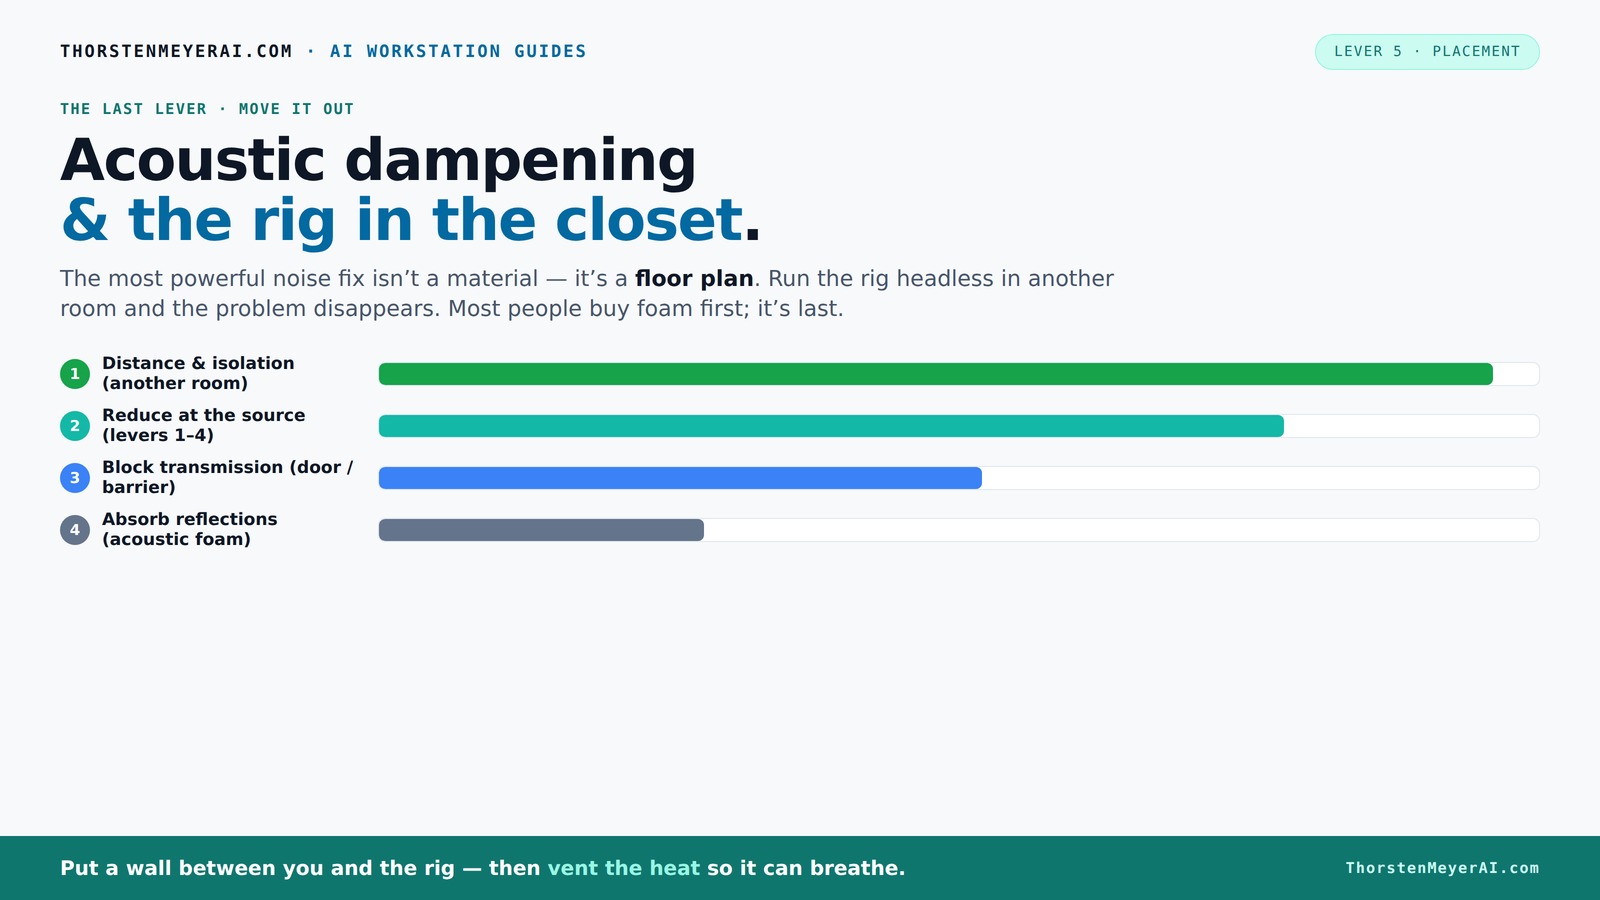
Acoustic dampening
& the rig in the closet.
The most powerful noise fix isn’t a material — it’s a floor plan. A rig you can’t hear because it’s in another room beats any amount of foam. Tap the approaches in Part 1 to see what actually works.
(another room)
(levers 1–4)
(door / barrier)
(acoustic foam)
Contain the noise, not the heat
Key Takeaways
- Sealing gaps around the door and outlets is as effective as adding foam for reducing noise leaks. Learn more about acoustic dampening and sealing.
- Placement of acoustic treatment around the reflection points dramatically improves recording clarity.
- Ventilation is critical—use ducted fans or passive vents to keep your rig cool without noise leaks.
- A closet can become a quiet, effective vocal booth with DIY materials, but sealing gaps and strategic placement are key.
- Over-treating or ignoring low-frequency buildup can make your recordings sound unnatural or boomy.

Focusound 52 Pack Acoustic Foam Panels 1" x 12" x 12" Sound Proof Foam Panles Soundproofing Noise Cancelling Wedge Panels for Home Office Recoding Studio with 300PCS Double-Side Adhesive
Soundproofing - Acoustic foam panels triangular grooves structure for better noise absorption, helps to reduce and absorb unwanted...
As an affiliate, we earn on qualifying purchases.
As an affiliate, we earn on qualifying purchases.
Why Soundproofing and Dampening Are Not the Same – And Why That Matters
Soundproofing and dampening are two different tricks. Soundproofing stops sound from escaping or entering your space—think sealing gaps and adding mass to walls. Dampening, on the other hand, reduces echo and reflections inside the room, making it sound less boomy.
For example, adding foam on the walls helps with dampening but won't stop your neighbor from hearing your vocals if your door is cracked open. Conversely, sealing the door with weatherstripping keeps outside noise out, but won't fix your echo problem inside the closet.
Understanding this distinction helps you focus your efforts: seal gaps first, then add absorptive materials inside.
Why does this matter? Because misallocating your efforts—like over-treating with foam without sealing—can lead to poor results. Seal gaps to block external noise and prevent sound leakage, which is often more cost-effective and impactful. Then, treat the interior surfaces to improve the clarity of your recordings by reducing internal reflections. Recognizing the tradeoff ensures you don’t waste resources on unnecessary treatments and get a balanced, effective setup.

ATS Acoustics Home Office Residential Acoustic Treatment Room Kit Sound Absorbing Acoustic Panel 8 Pack for 120-200 Sq Ft (Platinum)
8 Piece Kit contains 6 wall panels and 2 ceiling panels, each panel is sized 24" x 48"...
As an affiliate, we earn on qualifying purchases.
As an affiliate, we earn on qualifying purchases.
Where to Place Acoustic Treatment for the Best Closet Voice Recordings
Placement is everything in a closet. Start with the mic—position it at the reflection point, roughly a few inches from the wall, to minimize bouncing sound. Then treat the points where sound reflects back into the mic—like the wall behind and to the sides. See tips on acoustic treatment placement.
Most DIYers forget that treating only the corners isn’t enough. Covering the walls directly around your mic, especially those facing it, makes a noticeable difference. Use foam panels or blankets to cover reflective surfaces, and consider bass traps if the sound seems boomy or hollow.
Imagine you're recording a podcast. The mic should sit inside a 'zone' of absorption, with the reflective surfaces behind it and to the sides softened with materials. This setup keeps your voice clear and reduces echo.
Why does this placement matter? Because sound waves bounce off reflective surfaces, creating echoes and muddiness that compromise clarity. By strategically placing absorptive materials at the reflection points, you essentially 'trap' those bouncing waves before they reach the mic. This not only improves clarity but also creates a more controlled recording environment, which is especially critical in small, reflective spaces like closets. The tradeoff is that over-treating can deaden the sound too much, making recordings sound unnatural, so balance is key.

8" Room to Room Fan with Remote, Reversible Through Wall Fan for Quietly Circulating Air, 320 CFM Through the Wall Fan with Temperature Control, Durable Build Quality, In Wall Fan for Closet, Laundry
【QUIET, MOVE MASSIVE AIR】 This room to room fan quietly circulates air between two rooms to maintain a...
As an affiliate, we earn on qualifying purchases.
As an affiliate, we earn on qualifying purchases.
The Critical Role of Sealing the Closet Door and Gaps
Ever notice how much noise sneaks in through a slightly open door? Sealing gaps is often the cheapest and most effective way to cut down outside noise leaks. Learn about sealing and acoustic treatments.
For example, a YouTuber sealed his closet door with weatherstripping and added a blanket, dropping noise leakage by over 20 dB. This simple step made his voice recordings sound much cleaner and less bleed from outside.
But why is sealing so effective? Because sound leaks through even tiny gaps, and these leaks can undermine your entire effort to create a quiet space. Gaps around the door, outlets, and vents act as sound bridges, allowing external noise and internal echoes to escape or enter. Proper sealing creates a barrier that significantly improves noise isolation, making your setup more professional. The tradeoff is that over-sealing or sealing poorly can trap heat or moisture, so balance insulation with ventilation needs. Effective sealing is often the most cost-efficient upgrade that yields immediate improvements in sound isolation.

Audimute Soundproofing Acoustic Door Seal Kit - Door Sweep and Seal - (Large Size)
Includes (2) Door Seals (3/16" x 1/2" x 50') and (1) Door Sweep (1/2" x 1.5" x 25').
As an affiliate, we earn on qualifying purchases.
As an affiliate, we earn on qualifying purchases.
Ventilation in a Closet Rig — Keeping It Cool Without Noise
Putting a hot, busy computer in a sealed closet is a recipe for overheating. Good ventilation is mandatory. You need a way for hot air to escape while keeping noise in. Explore ventilation solutions for soundproofed spaces.
Passive vents, ducted fans, or even a small exhaust fan with a noise-absorbing duct can do the job. For example, a streamer installed a quiet exhaust fan with a duct to vent hot air outside, keeping temps stable and noise levels low.
In a small closet, a little effort in airflow prevents throttling and overheating, keeping your rig running smoothly without sacrificing silence.
Why is this important? Because without proper ventilation, your equipment can overheat, leading to thermal throttling, reduced performance, or hardware failure. Additionally, inadequate airflow can cause noise from fans to become more noticeable, defeating your soundproofing efforts. The tradeoff is that ventilation solutions must be quiet and well-placed to avoid introducing new noise into your recordings. Using ducted, insulated, or muffled ventilation systems balances cooling with soundproofing, ensuring your gear stays cool and your recordings stay clean. For more in-depth strategies, check out this guide on [how to reduce heat and noise in a high-power AI workstation](https://thorstenmeyerai.com/reduce-heat-noise-ai-workstation/).
How to Turn a Closet into a Functional Vocal Booth Without Breaking the Bank
Transforming a closet into a vocal booth can be a game-changer, but it’s all about smart placement and materials. Cover the walls with thick blankets and foam, especially on reflective surfaces. Use heavy curtains to block gaps and flutter echoes. And remember—sealing the door and proper placement are key.
Place the mic at the reflection point, about 6-12 inches from the wall, to avoid capturing too much room sound. Use a stand that isolates the mic from the closet floor to prevent low-frequency booms.
DIY options like moving blankets, foam, and weatherstripping keep costs low while boosting quality. For example, a podcaster turned his tiny closet into a vocal booth using a combination of blankets, foam panels, and a door seal kit, with excellent results.
Why does this work? Because a well-placed combination of absorption and sealing transforms a reflective, echo-prone space into a controlled environment. The tradeoff is that over-application of materials can deaden the sound excessively, so it’s important to find a balance that preserves natural voice tone while reducing unwanted reflections. This approach allows you to create a functional, budget-friendly vocal booth that enhances clarity and reduces noise bleed.
Check out the [guide to low-cost closet vocal booths](https://thorstenmeyerai.com/reduce-heat-noise-ai-workstation/) for step-by-step instructions.
Common Mistakes That Ruin Closet Soundproofing and How to Avoid Them
Many people think just tossing foam panels in will solve everything. Wrong. Gaps around the door, unsealed outlets, and untreated reflective surfaces still leak sound. Over-treating with foam without sealing gaps can trap heat and cause resonance issues.
Another mistake? Not placing treatment where it matters—the reflection points behind the mic. And ignoring low-frequency buildup can make your recordings sound boomy or hollow.
Fix these errors: seal gaps first, treat reflection points second, and add bass traps if needed. It’s a layered approach that pays off in clarity and quiet.
Failing to address these details can result in a space that sounds worse than untreated—dead, echoey, or boomy. The tradeoff is that skipping proper sealing or reflection treatment leads to persistent noise leaks or muddled recordings, which are hard to fix later. The key is to understand that soundproofing is not just about adding foam but about a comprehensive, layered approach that considers all weak points for a truly effective result.
Frequently Asked Questions
What is the difference between acoustic dampening and soundproofing?
Acoustic dampening reduces echoes and reflections inside a space, making it sound less boomy. Soundproofing prevents sound from escaping or entering, mainly through sealing gaps and adding mass to walls.Where should I place acoustic panels in a closet booth?
Focus on the reflection points around the mic—especially behind and to the sides. Covering these areas with foam or blankets minimizes bounce-back and improves clarity.Do I need panels on all walls?
Not necessarily. Partial coverage, especially on reflective surfaces around the mic, often provides the best bang for your buck. Prioritize the main reflection points.Are bass traps necessary in a closet?
Only if you experience low-end boom or standing waves. Small closets often develop bass buildup, so adding bass traps can improve sound balance.How do I reduce noise leaking through the door?
Seal gaps with weatherstripping, use acoustic sealant, and consider a door blanket or heavy curtain. These steps significantly cut noise leaks and flutter echoes.Conclusion
Remember, the real power lies in the details: sealing gaps, smart placement of absorbers, and ventilation. Foam alone won’t transform your closet into a professional studio—thoughtful setup and strategic thinking do.
Envision a tiny closet, now a whisper-quiet zone where your voice shines through, free of echoes and outside noise. That’s the goal. Take these tips, tweak your space, and turn that awkward closet into your best recording asset.